Showing posts with label diy. Show all posts

DIY birthday invitations in a box

November 12, 2015

Time flies and my baby already turns one next month - unbelievable! For this special day I have many plans and of course we throw a little birthday party with friends and family. And a great party requires special invitations!
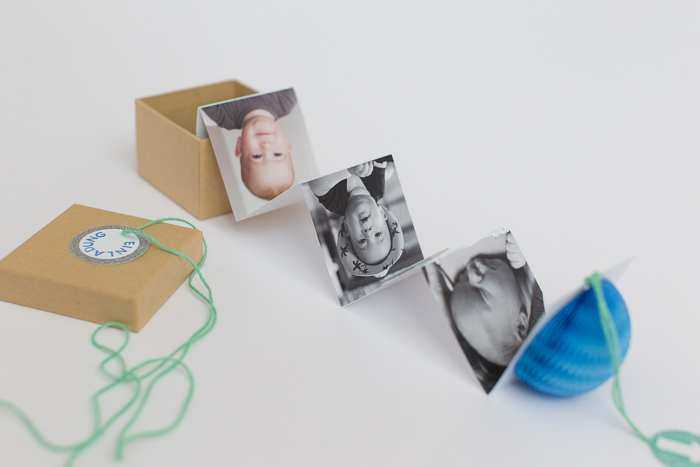
So I created a foldable invitation in a box with a mini-honeycomb ball as the icing on the cake.

You need: some skills in a layout program like InDesign, small craft boxes, small honeycomb balls, glitter paper, bakers twine, scissors, cutter knife, glue

Design your invitations fitting exactly into the craft boxes when they are folded and print them at the copy shop, using strong paper. Cut them out and fold them like an accordion, then stick the lowest part onto the bottom of the box. Next, stick the honeycomb ball half-opened onto the backside of the uppermost part of the folded invitation. For the round labels with the arrow, the number and the word "invitation" I used a puncher to get exact circles, but of course you can also cut them out with the scissors. Cut out two extra circles from the glitter paper for the invitation- and the number-label. They have to be a little larger than the printed labels! Fix the printed parts onto the glitter-circles with some glue and make a little hole on the invitation-label. The label with the number has to be fixed onto the provided space on the invitation. For the 3D-effect I used foam tape, but of course this is not a must. Make also a hole on the top of the invitation, fix a piece of bakers twine and stick two arrow-labels on it. Fold the invitation into the box, add the lid and tie it up with bakers twine and the invitation-label. Done!
If you want to make your guests a double joy you can even cram chocolate with.

If you like my design and you would like to use it, you can download a neutral printable version here. This version fits into 6 x 6 cm boxes. You can customize it in InDesign or Photoshop for example. The matching fonts are available here and here.  


craft boxes | Depot
bakers twine | Garn & mehr
honeycomb balls | Wabenball-Shop


gift wrapping with rose hips

September 15, 2014

Here comes just a quick idea for gift wrapping with rose hips and kraft paper... Autumnally elegant!


copper yarn | Garn & mehr

DIY leather tassel keychain

August 31, 2014

As the days here in Austria are already getting shorter and colder and as I'm getting more and more sluggish because of my growing bump, more time is left for DIYs and other projects. So here comes a little DIY for rainy Sundays like today... I like pretty keychains and this is an absolutely elegant version which is also easy to make. It's a tassel keychain made of leather.

You need: leather, keyring, pen, ruler, scissors, leather glue, clip, rubber band

Start by cutting two strips of leather - one that measures 8 cm x 0,5 cm and one that measures 25 cm x 9 cm.
Fold the smaller strip in half and through the keyring. Apply glue to the ends of the strip and affix them to each other. Fix it with the clip and leave to dry.
Use the ruler and the pen to mark 0,5 cm wide fringes on the bigger piece of leather and cut them. Leave a 2 cm strip uncut on one long side!
Apply glue on one end and affix the short strip with the keyring.
Begin rolling the fringed piece tightly around the smaller strip, applying glue at some points.
Glue the end of the fringed strip down onto itself. Fix it with a rubber band and leave to dry.
That's it!


wallet | Etsy
scissors | Hay

DIY Easter bunny jars

April 17, 2014

Easter is the time of bunnies and it's also the time of DIYs!
Therefore I made some simple Easter bunny jars. Filled with some sweets and hidden in the high grass it's a lovely little Easter present.

You need: an empty glass jar, bunny toy figure (for example from Schleich), spray paint, super glue

Start by gluing the bunny with super glue to the jar lid and leave to dry. Then carefully spray the glued bunny and lid until you have an even coat of paint and the original colour of both the bunny and lid are no longer visible. Leave to dry, fill with some sweets and now ready for hiding!


welcome 2014 with some paper art

January 1, 2014

I hope you all started well in 2014! This New Year's Eve was a quiet and cozy one for me and I spent the last afternoon in the old year with making some paper art from an old book. I saw this way of decoration on many blogs and I love it. You just have to fold the corners of the pages inward - that's it!
I wish you all the best for 2014!


vase | feinedinge*
paper ornaments | Dorisse@Die Sellerie

wrapping ideas with kraft paper and self-made embellishments

December 18, 2013

Only a few more days until Christmas - high time to wrap the gifts!
This year I prefer kraft paper and different self-made embellishments for wrapping. Get inspired!


1 | For the first one I've used gold and white baker's twine and these printable gift tags.

2 | The rosemary wreath was made according to this instruction. There you'll find also a printable template for the tags.

3 | For the version with the golden ivy leaves you'll need two ivy leaves, golden spray paint and yarn (I've used this one). Paint the ivy leaves with the spray paint and fix it with the yarn on your wrapped gift.

4 | This is the most simple version. Just fix a boxwood branch with a strip of golden washi tape on your present. Simple but pretty!

5 | Fold a sheet of golden paper (ca. 30 x 10 cm) step-like and bring it in a circular form. Fix it with some glue or staples and yarn.

Merry wrapping!

red wine cake with a DIY garland cake topper

December 11, 2013

My all-time favorite, especially at Christmas time, is red wine cake. Red wine, almonds and cinnamon are the perfect ingredients for a Christmas cake. And, as the crowning, a self-made garland cake topper with shining copper stars.


red wine cake

- 100 g dark chocolate
- 250 g butter (soft)
- 150 g granulated sugar
- 1 sachet vanilla sugar
- 4 eggs (medium size)
- 250 g all-purpose flour
- 3 tsp. backing powder
- 1 tsp. ground cinnamon
- 1 tbsp. cocoa powder
- 125 ml red wine (dry)
- 100 g ground almonds
for the frosting:
- 150 g powdered sugar
- 3 tbsp. water

Preheat the oven to 180°C. Grate the dark chocolate and grease a cake pan. 
For the batter beat the butter with the granulated sugar until fluffy. Then add the eggs and mix in. Mix up the flour with the backing powder, the cinnamon and the cacao powder and mix in briefly. Finally mix in the grated chocolate, the ground almonds and the red wine.
Pour the batter into the prepared pan and bake for about 60 minutes. Let the cake cool in the pan for 10 minutes, then turn it out.
For the frosting stir the powdered sugar with water until smooth and glaze the cooled off cake with it. 

recipe found here (German)


garland cake topper

For the garland cake topper you will need two wooden skewers, copper mirror cardboard, a star punch, yarn and glue.
Punch out 8 stars and glue them pairwise together with the yarn between. Fix the ends of the yarn on the wooden skewers and stick them into the cake. Finished!


cake plate | Depot
paper balls | House Doctor
candle holder | Tom Dixon
yarn | Garn & mehr
all other craft materials | craft store

DIY cork trivet with a golden highlight

November 15, 2013

As christmas is not far off, here's a little DIY! It's a simple trivet made from cork balls and a leather cord. It makes the perfect underlay for hot teapots and pans. As a little highlight I added a single golden ball, which I've painted with spray paint. A perfect little christmas present which does not take too much time to make it.

You need: 15 cork balls (3 cm diameter) with a hole (in case you can't get bored cork balls, you can bore them yourself), 60 cm leather cord, gold spray paint

Start by carefully spraying one of the cork balls with the spray paint and leave to dry. After drying string the cork balls onto the leather cord and tie the ends firmly with a double knot. Finished!


Proudly designed by Mlekoshi playground