little town life has moved!

February 16, 2016

little town life has moved from blogger to wordpress! littletown-life.blogspot.com will not be updated any longer!

Follow my new site also on bloglovin!


warm sunbeams in January

January 12, 2016

Christmas has gone too fast... Even faster than usually! Warm sunbeams hit my table and I'm still waiting for real winter. However, the first hyacinths are a small consolation...


candle holder | Jansen+co
sugar bowl | feinedinge*


animal Christmas

December 24, 2015

This Christmas is a little different... It's already Gregor's second Christmas, but the first in which he really will notice anything about it. So there was one big challenge: The Christmas tree has to be child-safe! Therefore, I used no fragile baubles - instead of and because Gregor loves animals, I've bought some animal decorations. The pug and the glitter deer has Gregor even picked hisself! ;)

I wish you and your familys a merry, merry Christmas and all the best for the upcoming year!


glitter deer | Lederleitner
big copper paper stars | Ikea
animal tree decoration | Interio 

the big party

December 5, 2015

Yesterday the time had come and Gregor turned one! Now I have a toddler instead of a baby.
Of course we throw a birthday party with friends and family and the matching cake and decoration...


copyright | littletownlifeblog.com

Christmas & diamonds

November 29, 2015

This year's Christmas season has started and in our bedroom it's all about diamonds!


copper diamond | Louise Roe
vases | feinedinge*
candle holder | Iittala
paper diamonds | Ikea

cool and calming colours - WYT

November 26, 2015

Wyt is the friesian word for "white" and when you enter the stylish - newly opened in May this year - shop in Vienna's Währinger Straße you know why owner Ulrike Knopp has chosen this name... Earthy, cool and calming colours and especially white are dominant. Furniture and home accessories like baskets, tableware, blankets, pillows, lamps, mirrors and vases made of light wood, soft fabrics and other high quality materials - in a word: very nordic!


The last powerful colours

November 13, 2015

I can't remember of an autumn with such powerful colours! This year it's sensational! I absolutely love the play of colours of Geranium cantabrigiense and the candy-like fruits of Callicarpa bodinieri, matching so perfectly with my new vase.
Nevertheless, hoping so much for winterly white and seasonable temperatures...


frame | Moebe | Die Sellerie

DIY birthday invitations in a box

November 12, 2015

Time flies and my baby already turns one next month - unbelievable! For this special day I have many plans and of course we throw a little birthday party with friends and family. And a great party requires special invitations!
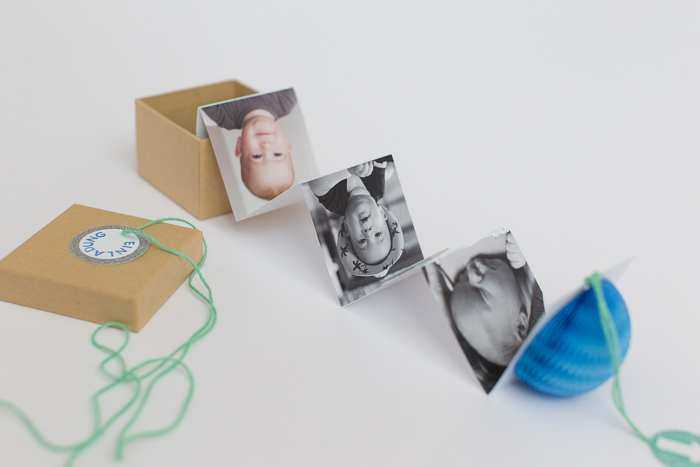
So I created a foldable invitation in a box with a mini-honeycomb ball as the icing on the cake.

You need: some skills in a layout program like InDesign, small craft boxes, small honeycomb balls, glitter paper, bakers twine, scissors, cutter knife, glue

Design your invitations fitting exactly into the craft boxes when they are folded and print them at the copy shop, using strong paper. Cut them out and fold them like an accordion, then stick the lowest part onto the bottom of the box. Next, stick the honeycomb ball half-opened onto the backside of the uppermost part of the folded invitation. For the round labels with the arrow, the number and the word "invitation" I used a puncher to get exact circles, but of course you can also cut them out with the scissors. Cut out two extra circles from the glitter paper for the invitation- and the number-label. They have to be a little larger than the printed labels! Fix the printed parts onto the glitter-circles with some glue and make a little hole on the invitation-label. The label with the number has to be fixed onto the provided space on the invitation. For the 3D-effect I used foam tape, but of course this is not a must. Make also a hole on the top of the invitation, fix a piece of bakers twine and stick two arrow-labels on it. Fold the invitation into the box, add the lid and tie it up with bakers twine and the invitation-label. Done!
If you want to make your guests a double joy you can even cram chocolate with.

If you like my design and you would like to use it, you can download a neutral printable version here. This version fits into 6 x 6 cm boxes. You can customize it in InDesign or Photoshop for example. The matching fonts are available here and here.  


craft boxes | Depot
bakers twine | Garn & mehr
honeycomb balls | Wabenball-Shop


Proudly designed by Mlekoshi playground